In this rapidly evolving connected world of ours, being able to connect things properly is very important — and rest assured, RJ45 is one of those things. If you are building a home office network, setting up an enterprise IT infrastructure, or doing anything else that requires reliable high-speed data transfer between different devices, then you must know how to crimp Ethernet cables well. This guide covers everything about RJ45 connectors in detail: it provides step-by-step instructions on making custom ethernet cables from scratch. The author explains each part involved, starting with what tools are needed, which materials work best, how tight joints should be, etcetera. By the end of it all, not only will readers have learned where they went wrong during previous attempts, but they will also feel confident enough when dealing with future ones because here we tell them why some things didn’t work while others did based on good practices followed throughout this process.
What is an RJ45 Connector and How Does it Work?
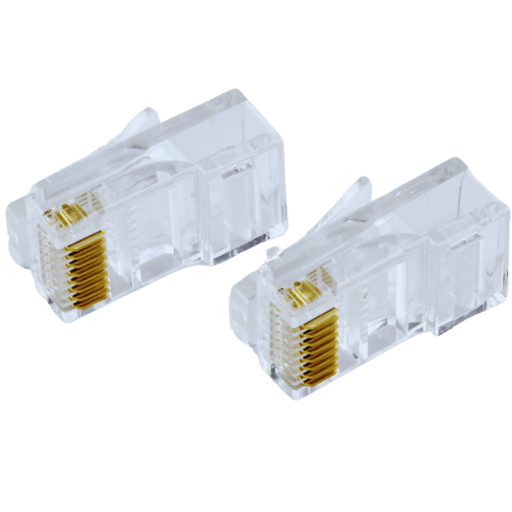
Understanding the RJ45 Connector Structure
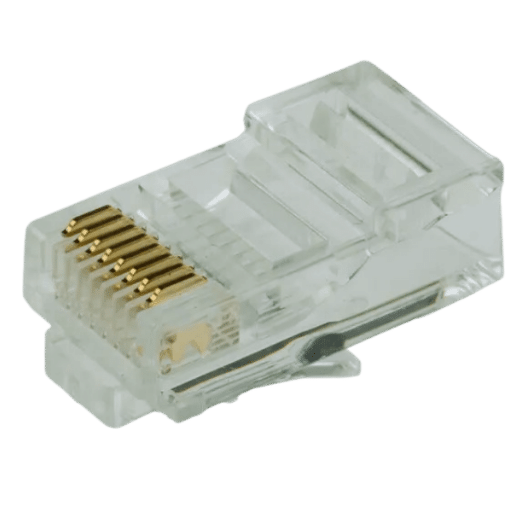
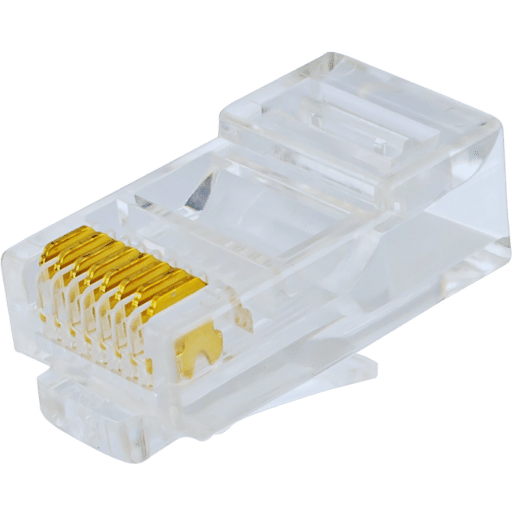
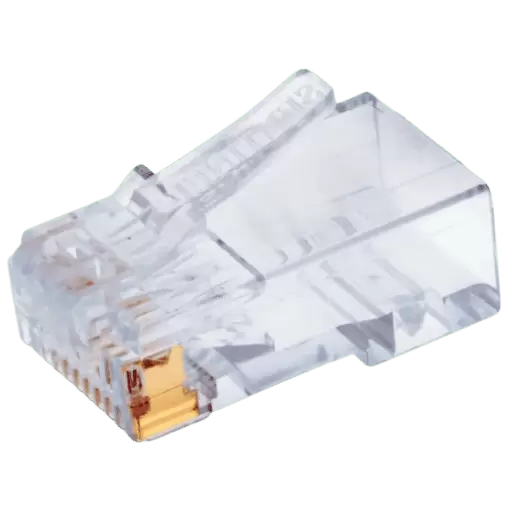
Ethernet networking often makes use of an 8P8C (8 positions, eight contacts) RJ45 connector that is designed to terminate twisted pair cables. The connector itself consists of a plastic housing that holds eight metal contacts in a precise arrangement; these contacts then pierce through the insulation surrounding each wire inside the cable so as to create electrical connections with all eight wires. Most connectors also have a small tab for locking them securely into Ethernet ports – this locks them into place and ensures reliable data transfer over networks. Crimps must be done correctly if one wants good network performance because crimping involves modifying the shape or size of something by flattening it down or squeezing it together firmly until its surface area becomes smaller or its thickness decreases.
How RJ45 Plugs Connect to Ethernet Cables
To connect Ethernet cables to RJ45 plugs, there are some specific steps that must be followed. First, the outer jacket of a twisted pair of cables is removed to reveal the internal wires. These wires are then straightened out and organized in accordance with either the T568A or T568B wiring standard. After lining them up, they should be cut so that all are the same length before being gently inserted into an RJ45 connector, where each wire must reach its corresponding slot right up until it goes through the other side completely. Last but not least comes crimping; this is done by using special pliers designed specifically for crimping RJ45 connectors, which push contacts down onto conductors, thereby creating secure electrical contact between the two sides of the connection – the male end and the female end (plug). The main aim of performing these procedures is to facilitate speedy data transfer over an ethernet cable by ensuring good physical contact between the metal parts of an RJ45 connector and the wires inside that cable.
Common Applications for RJ45 Connectors
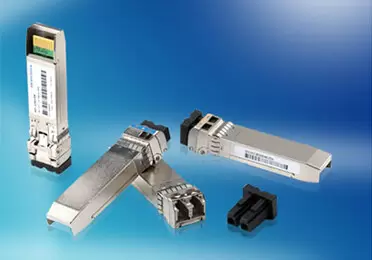
Because they are reliable and efficient in transmitting data, RJ45 connectors have gained wide application in residential as well as commercial environments. The major use of these connectors is in Ethernet networking for faster internet connections and local area networks (LANs). In offices, data centers, and homes, such devices are critical as they connect computers, routers, and switches, thereby forming a network backbone. Telecommunication systems employ RJ45 connectors for voice over IP (VoIP) phone systems, among other communication devices. In industrial settings, RJ45 connectors are used with programmable logic controllers (PLCs) together with other control systems to ensure smooth communication and operation.
How to Choose the Right RJ45 Connector?
Types of RJ45 Connectors: Cat5, Cat5e, Cat6, and Cat6a
Knowing the differences and capabilities between Cat5, Cat5e, Cat6, and Cat6a cables is essential when choosing an RJ45 connector.
Cat5: The Cat5 (Category 5) is a previous version that can support up to 100 Mbps speeds with frequencies reaching 100 MHz. This standard is used less frequently nowadays due to its poorer performance compared to modern standards.
Cat5e: The Cat5e (Category 5 enhanced) is an upgraded version of Cat5, which allows for higher data transfer rates up to 1 Gbps at frequencies of 100 MHz. It was designed specifically for use with Gigabit Ethernet networks, where it reduces crosstalk.
Cat6: The maximum speed of the Cat6 (Category 6) cable is 10 Gbps over short distances (up to 55 meters). Its frequency range extends up to 250 MHz while having more stringent requirements regarding crosstalk among others making them perfect for high-speed networks.
Cat6a: Designed as an extension beyond what’s possible even after upgrading from a regular cat6, cat6a cables offer support for speeds up to 10 Gbps over longer runs of cable(up to a maximum distance of 100 meters), and also feature cross-talk-reducing shielding, thus enabling operation at frequencies as high as500 MHz which makes them suitable when building data centers or enterprise networks that require top performance
To choose the right RJ45 connector, you should consider your network speed needs, how far apart devices are within proximity limits set by each cable type, and future-proofing considerations, among other factors.
Shielded vs. Unshielded RJ45 Connectors
When it comes to choosing between shielded and unshielded RJ45 connectors, the environment and specific application of your network should be taken into account.
Shielded RJ45 Connectors (STP): These connectors have extra shielding around their inner wiring, which protects them from electromagnetic interference (EMI) and radiofrequency interference (RFI). They are perfect for places with lots of interference, such as industrial areas with heavy electrical equipment and data centers, among other fast data transfer points, because they offer better protection against external noise.
Unshielded RJ45 Connectors (UTP): These ones do not come with any additional shielding and, hence, can easily be affected by EMI or RFI. However, they are easier to install than the shielded types, more flexible in terms of where they can be used, and generally suitable for most standard office or residential applications where there is minimal interference—typically utilized in situations where cabling will not be exposed to significant external noise sources.
In a nutshell, shielded RJ45 connectors work best when there is high interference or a need for maximum data integrity, while Unshielded ones are good enough for lower-interference, cost-sensitive installations.
Solid Wire vs. Stranded Cable for RJ45 Connectors
When deciding on solid wire versus stranded cable for RJ45 connectors, there are a few things you should know about them.
Solid Wire: Solid wire has a single conductor, which can be used over long distances. This is because it suffers less attenuation than braided cables do. It also tends to be more rigid and stable than other types of wires, so it often finds use in permanent installations such as those within walls or ceilings. Moreover, when terminated with punch-down blocks or insulation displacement connections (IDC), solid wire provides the most reliable connection possible.
Stranded Cable: A stranded cable contains many smaller wires twisted together into one conductor. The benefit of this design is that it makes the cable much more flexible and easy to work with wherever frequent movement or bending might be expected—e.g., patch cables in racks or workstations. However, though stranded cables may exhibit slightly higher attenuation over longer lengths and cost slightly more money, people like them because they are durable enough to withstand being moved all the time while still simple enough for anyone who needs one in an ever-changing environment to find a use for them easily.
In conclusion, if you want something that sees little to no movement over great lengths, then stick with solid wire, but if what you need calls for short-length applications involving lots of flexing and pulling around, then go ahead and get yourself some stranded cable!
What Tools Do You Need to Crimp an RJ45 Connector?
Essential Crimp Tools for RJ45 Connectors
If you want to crimp an RJ45 connector effectively, you should have these tools:
- Crimping tool: This is a specialized tool that attaches RJ45 connectors to the end of cables. It applies enough pressure to hold connector pins onto wires for good contact. Most tools come with interchangeable dies for different types of connectors.
- Cable stripper: This is used for removing outer insulation from Ethernet cables without damaging inner wires. It has adjustable blades that can fit various cable diameters, making it fast and accurate in stripping.
- Cable tester: When crimping is done, you need a cable tester to check if the new connection works properly. It tests continuity, signal strength and correct wire mapping so that a cable functions as expected before being deployed.
These three necessary instruments ensure reliable RJ45 terminations every time whether setting up professional or home networks.
Using a Modular Crimp Tool for RJ45 Termination
To follow these brief instructions for using a modular crimp tool in RJ45 termination:
- Prepare the Cable: Utilize a cable stripper and remove the outer jacket of an Ethernet cable which is about 1-1.5 inches long, being careful not to damage any inner wires.
- Untwist and Arrange Wires: After stripping them, untwist pairs of wires and put them in order following T568A or T568B wiring standard; then flatten them out neatly, cutting across so that they are all even.
- Insert Wire into the Connector: In the correct arrangement, one should carefully insert the wire down into an RJ45 connector, making sure each goes into its slot with the cable jacket going slightly inside the connector where it will be crimped on for strain relief.
- Crimp Connectors: When squeezing handles firmly together on a Modular Crimp Tool after placing an RJ45 connector between them, pins should be pushed by the crimping tool into all wires, ensuring the connection is secure.
- Test Connection: With the use of a cable tester, you can confirm whether the termination was done correctly or not; this step guarantees strong signal correctness and wire map accuracy before deploying the cable itself.
These steps give rise to consistent and dependable terminations of RJ-45s that can work well in different networking environments.
Additional Tools for RJ45 Crimping
To speed up and make more precise your RJ45 terminations, there are some other tools that you can use.
- Cable Tester: This is necessary for the verification of RJ45 termination integrity. It is used to test if cables are properly pinned and also helps in identifying cable faults or inconsistencies.
- Punch Down Tool: This tool works by pushing wires into terminal blocks when terminating them onto a keystone jack or patch panel hence cutting them off cleanly.
- Cable Stripper: Also known as wire stripper, this device is employed in removing outer sheath of Ethernet cables without causing any damage to internal conductors. Mostly it has quick and accurate stripping capabilities which are needed for clean termination.
- RJ45 Connectors: A good quality connector should provide a firm connection after termination. They come in two types: shielded and unshielded connectors, depending on what you want to achieve with your network installation.
- Wire Cutters: These are used for making precise cuts on wires so as to give them equal lengths that can be inserted into an RJ 45 connector uniformly.
If used together with modular crimping tool these equipments will enable one achieve professional looking network cable terminations which can be deployed at small scale networks or large scale enterprise environments.
Step-by-Step Guide: How to Crimp an RJ45 Connector
Preparing Your Ethernet Cable
- Measure and Slash the Cable: Ascertain the desired length of the Ethernet cable and use wire cutters for a neat cut.
- Strip the Outer Jacket: Employ a cable stripper to remove about 1 to 2 inches of the outer jacket from the cable end without damaging the inner wires.
- Untwist and Organize the Wires: Gently untwist wire pairs then arrange them according to T568A or T568B wiring standard as required by your network.
- Trim the Wires: Straighten out all wires, align them evenly, and trim with a precision wire cutter to about 0.5 inches from the jacket.
- Insert Wires into RJ45 Connector: While holding the connector clip side down, firmly push each wire into its slot, ensuring they are seated well enough but not too hard that you can’t take them out again if needed later on – also, make sure they go in correct order!
- Check Wiring Order: Look through front end of connector to see if colours are same on both sides – this means everything is okay so far.
- Crimp Connector: Put RJ45 connector into the crimping tool, then squeeze handles together tightly so that it cuts through the insulation around each wire, thus forming a connection between them which will terminate cable once released from jaws.(i think? maybe?)
- Test Cable: Use cable tester (or switch) followed by other devices such as PC or laptop while checking lights on tester for proper working of crimped cables, pin configuration correctness and any possible problem found during testing process.
Following these steps should help you properly terminate an ethernet cable which in turn makes it work reliably within network setup.
Crimping an RJ45 Plug onto the Cable
- Prepare the cable: These are the steps (1-7) you need to follow to terminate the cable correctly.
- Choose the right wiring standard: Make sure you have selected the correct wiring standard (T568A or T568B) depending on your network requirements.
- Line up the wires: Rearrange all of them in order and before pushing them into an RJ45 connector, make certain they are straightened out properly.
- Insert wires into the connector: Push each wire into an RJ45 plug until it can be seen through the front; the outer jacket should fit beneath the strain relief tab on the connector.
- Crimp connector: Place an RJ45 connector into the crimping tool so that it goes all the way inside; squeeze the handles of this tool hard until they stop moving down – metal contacts will get pushed onto every wire, and hold the plug firmly onto the cable.
- Check connections: Look at connector after crimping is done – pins must sit evenly within plug without any looseness or wobbling around them.
- Test completed cable: Use a cable tester to check continuity problems or miswiring. Test whether everything works fine with cables like these ones.
So stick rigidly to these steps and you should be able to crimp rj45 plugs on ethernet cables with confidence that they will work well in your network connections.
Testing Your Crimped RJ45 Connection
It is important to test a crimped RJ45 connection to ensure that your network setup is working properly. Here’s how you can do it:
- Use a Cable Tester: Attach each end of the crimped Ethernet cable into the corresponding ports on the cable tester. Turn on the power and wait for it to complete its diagnostic process. Normally, the tester will indicate if all wires have been connected rightly or if there is any lack of continuity.
- Check Continuity and Pair Integrity: Confirm that all pairs are wired correctly according to what is shown by the test meter. Conduct continuity tests to ensure that no circuit is open-ended and pair integrity tests for each twisted pair in relation to selected wiring pattern (T568A or T568B).
- Test Network Performance: For more comprehensive analysis, connect this cable with other network devices like computer-to-router or computer-to-switch links. Perform file transfer tests or monitor speed and bandwidth using network diagnostic tools so as to ascertain whether expected performance criteria have been met by this connection.
These procedures confirm both the correctness of assembly as well as full functionality of an RJ45 plug thereby preventing potential networking problems.
Common Issues and Fixes with RJ45 Connectors

Fixing Poor Connections in RJ45 Crimps
In the event of an RJ45 crimping failure, it is crucial to detect and tackle conventional problems in a methodical manner. Here’s what to do when troubleshooting such issues:
- Investigate the crimp: Check if all pins are uniformly crimped on the RJ45 plug. Poor connections may result from misalignment or incomplete sheathing. Remove the wrongly secured plug and fix another one by ensuring that you push the wires completely into their respective holes before aligning them correctly and cupping them.
- Order of wires: Confirm that the wire sequence adheres to either the T568A or T568B wiring standard being used. Cross-talks, among other communication malfunctions, can be caused by wrong wire arrangement. If the order is not correct, strip the cable, then reorganize the cables back into proper order before crimping a new plug.
- Strip adequately: Ensure enough insulation has been removed from each conductor so as they can make good contact within an RJ45 connector. However, do not over-strip since this might expose wires hence leading to their breakage.
- Cut sharply and twist neatly: Use high-quality wire cutters for making clean cuts on individual conductors; also, keep pairs twisted as close as possible to the connector – it helps minimize noise levels, thus enhancing performance.
- Mechanical testing: Sometimes, poor crimps can be attributed to physical faults of the plug or crimper itself. Verify that your tools are functional and devoid of manufacturing defects present on RJ-45 plugs.
These steps will help you solve most issues associated with bad RJ45 crimps, thereby ensuring strong network links that are dependable in nature.
Addressing Shielding Problems in RJ45 Connectors
According to some experts, shielding problems in RJ45 connectors can drastically affect network performance, especially in places with high electromagnetic interference (EMI). Here’s what you can do about it:
- Choose Shielded RJ45 Connectors: Opt for shielded RJ45 connectors also known as STP (Shielded Twisted Pair) connectors that are designed to guard against EMI. Typically these have metallic shields surrounding each cable pair individually which provides better protection than not having any at all.
- Ground Properly: Ensure proper grounding of the shielding used within an RJ45 connector. Failure to do so can nullify advantages associated with using shielded cables thereby perpetuating interferences. Attach the shield to the ground terminal on your network equipment.
- Employ Shielded Ethernet Cables: Pair your shielded RJ45 connectors with appropriate Ethernet cables that have a shield such as CAT6A or CAT7 STP cables. The overall category rating of these cables should be higher than or equal to those being protected i.e., if you’re using CAT5e then go for CAT6a etcetera. What this does is it extends the shielding around twisted pairs thus reducing crosstalk and other effects caused by EMI exposure.
- Protect the Shield Integrity: Do not compromise on the integrity of a shield during crimping; any breakage along its length renders useless all efforts made towards mitigating against EMI through shielding. Employ right methods and tools ensuring no damage is done unto shields throughout their connections’ life cycle.
- Consider Environmental Factors: Additional measures might need adoption where there’re increased levels of electromagnetic interference—such as industries or places having numerous heavy electrical appliances; this involves adding more protections like conduits and metal casings over network cables themselves within affected regions .
Toward lessening electromagnetic disturbances’ impact on signal quality stability while traversing LANs, use only genuine high-performance shielded plugs together with correct grounding techniques coupled maintained physical barrier integrity throughout implementation process.
Troubleshooting Signal Loss in Ethernet Cables
There are several reasons for signal loss in Ethernet cables which can affect your network’s reliability and performance. Here are some of the most common causes and steps to rectify them:
- Cable Length: Ethernet standards like CAT5e or CAT6 have a maximum cable length of 100 meters (328 feet). Going beyond this distance may result in signal weakening. Make sure your cable runs adhere to these limitations.
- Connector Quality: Low-quality connectors or incorrect crimping might be behind the signal loss. Use RJ45 connectors of high quality and ascertain that they’re properly fixed. Check for any visible damages or loose connections on connectors.
- Cable Damage: Signal transmission could be hindered by physical harm inflicted on wires such as cuts, kinks, or tight bends among others. Inspect all cables for signs of physical damage and replace where necessary.
- Interference: Electromagnetic interference (EMI) from fluorescent lights, power lines or other electrical appliances can disrupt signals being transmitted. To reduce EMI use shielded cables and ensure correct grounding.
- Patch Panels and Keystone Jacks: Poorly installed patch panels, keystone jacks, dirty connections or insecurely fastened connections can also lead to signal loss. Ensure that there is a good connection at every point; also, make certain patch panels are securely mounted & keystone jacks correctly fitted.
By following these guidelines step-by-step you will be able to recognize as well as fix the problems associated with signal loss over ethernet cables hence making it more reliable for networking purposes.
Frequently Asked Questions (FAQs)
Q: What is an RJ45 connector?
A: An ethernet rj45, also known as an RJ45 connector, is a jack that connects the ends of cables used for computer networking such as cat6 cables; it is widely used in network cabling to join devices with a router or network switch.
Q: What are the differences among Cat 5, Cat5e, and Cat6 cables?
A: In contrast to cat5e and Cat6 cables, which have more stringent performance criteria than their predecessor (cat 5 cable), older versions of this type of cable have lower standards for performance. They offer better signal quality due to reduced crosstalk between wires. Besides having stricter requirements for system noise and crosstalk than its predecessors do (cat 5 and cat5e), cat6 cable can transmit data at rates up to ten gigabits per second over short distances.
Q: How do I crimp an Ethernet cable using Cat6 RJ45 connectors?
A: To crimp an ethernet rj45 cable together, follow these steps; strip the cable jacket, untwist the wire pairs, align the wires in the correct order inside a cat6 connector then use crimping tool to secure them but make sure you read the product description since there might be different types of connectors with their specific instructions on usage.
Q: Are RJ45 connectors compatible with both solid and stranded cables?
A: Yes, many RJ45 connectors like CableCreation’s Cat6 RJ45 ends support solid wire as well as stranded cable, though one should always refer to the manufacturer’s specifications to confirm compatibility.
Q: What are some advantages of gold-plated contacts in RJ45 connectors?
A: Gold plating the contacts within an RJ-45 connector provides greater conductivity while resisting corrosion, thus enhancing reliability/longevity, especially where ether-net connections may oxidize or exposed moisture is relatively high.
Q: May I utilize Cat5e cords with Cat6 RJ45 connectors?
A: Yes, you can use Cat6 RJ45 connectors with Cat5e cables and they usually provide stronger and more reliable connections. However, to achieve the best performance it is always recommended using connectors made specifically for that type of cable.
Q: Where should I buy large quantities of RJ45 connectors?
A: Electronics supply stores offer bulk packages such as 50 pack, 100 pack or even larger quantities of RJ45 connectors. You can also find online retailers who sell them in bulk for bigger projects or commercial use.
Q: What does 8P8C mean and how does it relate to RJ45?
A: The term 8P8C (eight position, eight contact) refers to the actual interface used in the RJ45 standard. Although often used interchangeably with cable connector and port, technically speaking this connector itself is an 8P8C.
Q: Do I need a specific tool kit for crimping RJ45 connectors?
A: Yes, without a tool kit designed for crimping ethernet cables terminated by means of an rj-45 plug there would be no way to properly terminate them. These kits usually contain a crimping tool, cable cutter, and sometimes even a cable tester, which will help ensure that all connections are secure and operational at the end of your work.
Q: Are there different types of rj45 ethernet connectors for various applications?
A: Yes, pass-through connectors, shielded connectors, and standard modular plugs – these are all examples of different types within the category known as “rj45 connector”. Each type serves its own purpose with regard to usage scenarios or supported wires, so before making any choice, make sure it fits your needs.
Post Views: 11,936