Network installations require high precision and dependability for effective communication in the modern world, where everyone is connected. The RJ45 punch-down tool is an auxiliary tool that everyone handling wiring should possess, especially when performing keystone jack termination. The goal is to provide an instructional guide about the RJ45 punch-down tool, where its use is, and the best techniques to achieve good outcomes are described. By the end of this section, whether you work as a certified technician or prefer doing things the do-it-yourself way, using this particular tool correctly will positively impact your network setup and maintenance. This will include the proper steps, things that should not be done, and general tips for ensuring that RJ45 keystone jacks are fitted correctly and securely.
What Is an RJ45 Punch Down Tool and How Does It Work?
Understanding the RJ45 Connector and Punch Down Tool
The RJ45 connector is commonly an interface in Ethernet networking systems, facilitating connectivity between devices like computers, routers, and switches. It usually has eight gold-covered plugs on its foundation that can communicate electrically to the corresponding cables, which makes the device perform effectively. This punch-down tool is an implement that is used to press and insert wires into the grooves on the RJ45 connector. The tool can slice off the extending portion of the insulation as it inserts the cage for a proper mechanical attachment, making the joint very reliable. Equipment is almost useless in the hands of the engineer without coinciding with the expertise, resulting in frustrations in installations. Even at worst, signal loss or a break in the connection does happen.
Different Types of Keystone Jacks
Keystone jacks are vital elements of a network architecture that help in patching various network cables flexibly and effectively. The three main types of keystone jacks are:
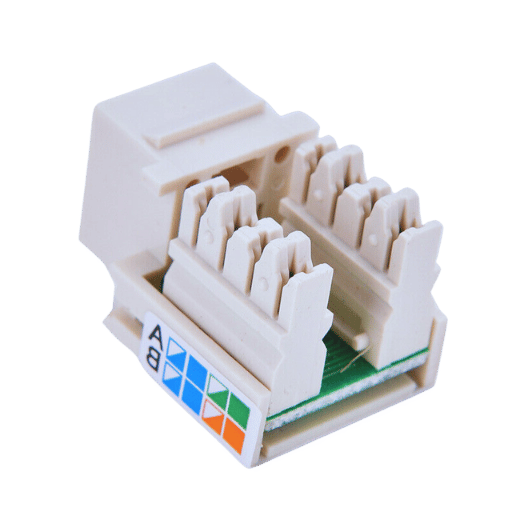
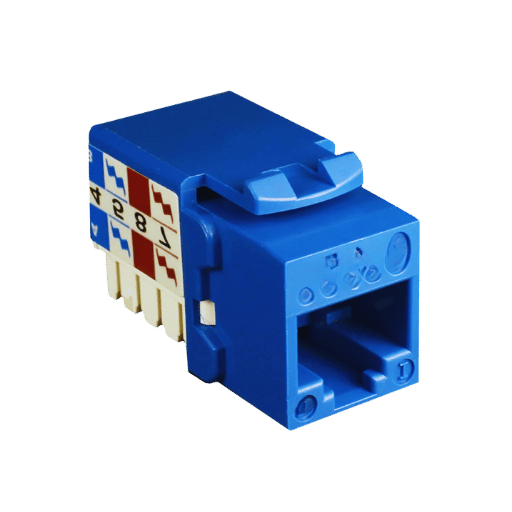
- Cat5e RJ45 keystone jacks are an integral part of thesetworking options.: Built to enable Ethernet networks of speed not more than 1 Gbps, Cat5e jacks are usually paired with twisted pair cable And are common in residential and small offices cat5e jacks have onscreen patch-off utilities that are not coated. They Have simple punch-down facilities for installation
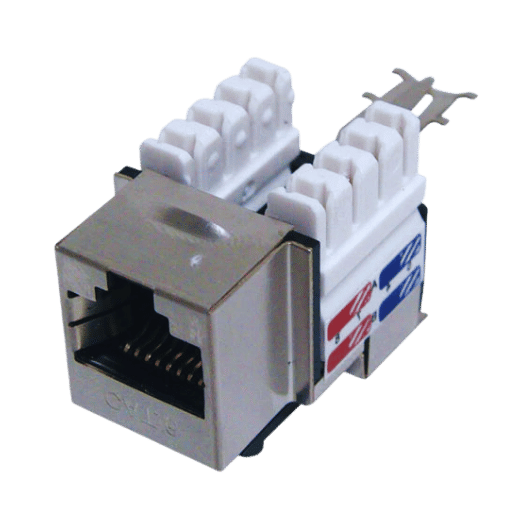
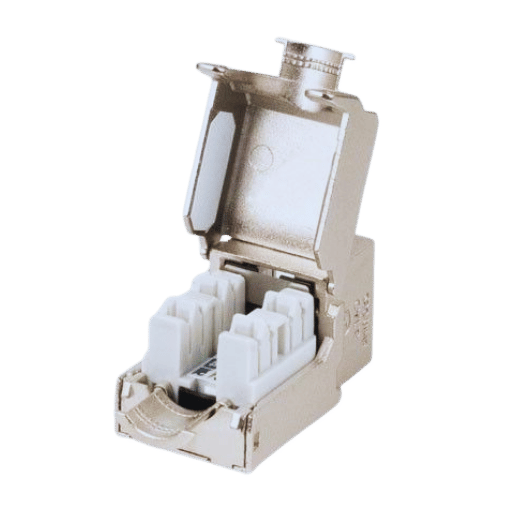
- Cat6 Keystone Jacks: These are improved versions of Cat6 jacks that can support high network speeds up to 10 Gbps within a short distance range. This type of configuration is best suited for high-usage data communication networks and has better shielding from interference and crosstalk.
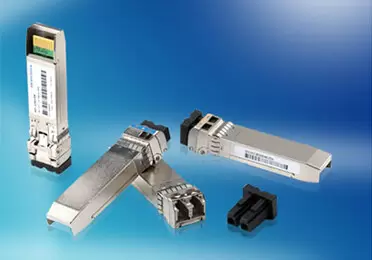
- Fiber Optic Keystone Jacks: These types of jacks are specially made for fiber optical cables and help in high-speed data transfer over longer distances. This type of easier integration provides SC, LC, and ST connectors with several options.
Various terminologies describe the various RJ45 keystone jacks and help understand their specific uses in various network applications, so it is paramount that the right jack be chosen.
Steps to Use a Punch-Down Tool
- Trim a cable: Remove 1 inch of duct tape at the end of the network cable to expose each of the wires inside.
- Bring the Wires Next to Each Other: If the wire arrangement is compatible with the standards used (T568A or T568B), ensure that the wires fit into the correct spots on the keystone jack.
- Insert Wires: Ensure that each wire is placed far in the correct slot on the RJ 45 keystone jack, ensuring the depth is adequate for stable connectivity.
- Use the Punch-Down Tool: Place the punch-down tool over the wire and the keystone connector in the wires’ case and push down until the wire fits inside the keystone.
- Cut off Extra Wires: Once all the wires have been installed, the punch-down tool will cut off all the wires that extend past the base of the connector.
- Make the Connection: Finally, to conclude, it is necessary to check the network’s working using a testing device before covering the outlet or any other faceplate.
How to Choose the Right Keystone Jacks for Your Needs
Comparing Cat6 and Cat5e Keystone Jacks
There are a number of important factors to consider when choosing between Cat6 and Cat5e keystone jacks with regards to the technical specifications. However, standard Cat5e jacks have been built for efficient transmission of data to a maximum of 1Gbps (Gigabit Ethernet) and at a bandwidth frequency of 100Mhz, making it appropriate for regular network use. In contrast, although the Cat6 jacks have an operational bandwidth capacity of 250Mhz, they support transmission speeds of about 10Gbps but only within a shorter distance (up to 55m) range with better performance under high load requirements. Furthermore, the Cat6 jacks normally provide additional structures to minimize the crosstalk; hence, less signal interference occurs. Lastly, the classification should depend on the particular context of the application within the network infrastructure in terms of the speed and bandwidth requirements.
Benefits of Using Cat6 Keystone Jacks
There are ample benefits of using the Cat6 keystone jacks when required in order further to improve the performance and the reliability of the network. First, The higher bandwidth capabilities, approximately 250 MHz, allow for a pretty fast speed of data transfers, making them preferable in situations that require high bandwidth, like video and games on the web. Also, there will be less crosstalk interfacing due to Cat6 jacks, thus clearer signals and better network performance in the aggregate. To make it easy during an upgrade, the Cat6 cables also work with Cat5e and other lower-category cables without scrapping the old database. Thus, providing Cat6 jacks will ensure performing tools and productive work in the household or business by creating a stable and fully functional network system.
Essential Features to Look for in a Keystone Jack
From a user perspective, there are many key specifications for the keystone jack that must be taken into account to avoid undesired performance characteristics and other issues regionally. First, confirm the category of the jack, for example, if it is a Cat5e, Cat6, or a higher category, which specifies the speed and the bandwidth capabilities. Secondly, think through the quality of the material; jacks that are designed using metal parts will provide more signal-carrying capacity. The third point is compatibility with the existing plates and panels so that the installation can be done within the existing framework. Furthermore, properties like these, which are above the character limitations, will help cut the length of the period one is engaged in setting up the system. Lastly, take a look at who the manufacturer is and what kind of warranties are available, as these point to the quality and durability of the product. A keystone jack with such functionality will complement and maintain a sound and efficient operating environment of the network in question.
Common Problems with RJ45 Punch-Down Tools and How to Fix Them
Troubleshooting Connection Issues
When the connection is a problem with RJ45 punch-down tools, it is advisable to perform a stepwise search for the cause of the problem. First, ensure that all the ends are crimped and that the wires are pushed down into the installed punch-down blocks without any of the insulation being rested aside. If the connection is still faulty, the cable can be tested for breakage without disconnecting using a cable tester. Moreover, a specific pinout standard (T568A or T568B) should be applied throughout the network to avoid mismatched wiring configurations. If interference is possible, be aware of the locations of the cables, and do not run Ethernet cables next to power cables. Finally, if slow internet is still common practice, remove the keystone jack and the punch-down tool to check if there are any damages to either as they may be a fault.
How to Avoid Damaging Your Keystone Jack
These precautionary measures will go a long way in minimizing possibility of any threat to your keystone jack:
- Proper Handling: Do not forget that the keystone jacks are delicate devices. Excessive force should not be applied while inserting or withdrawing the cables so as to avoid stressing and damaging the internal elements.
- Use the Right Tools: If a keystone jack needs to be punched down, punch-down tools are available. If the tools used for fitting RJ45 keystone jacks are too big or inappropriate, the jacks may be damaged.
- Correct Termination: Cross-check that Ethernet cables have been terminated properly according to T568A or T568B standards. Problems with the ethernet jack could be attributed to problems with the wiring.
- Avoid Overtightening: Do not apply too much pressure while tightening cables to the jack using screws as this would strip the screw threads and may break the casing of the jack.
- Environmental Concerns: Do not store keystone jacks in poorly ventilated areas that harbor a lot of moisture, high or low temperature or dusty environment as they can compromise the materials and usage of the jack.
Following these recommendations, you can expect to prolong the lifespan of the keystone jacks and work with a strong network for quite some time.
Tips for Proper Termination
- Follow Wiring Standards: The most important point in ensuring similar performance for all your network installations is the use of the T568A or T568B wiring standards.
- Verify Pair Integrity: The compact configuration of twisted pair cables can enhance reliability, while termination should preserve the twist of the pairs and thus help reduce crosstalk.
- Use Adequate Strip Length: Strip the cable sheath minimally to avoid exposing the twisted wires (remember this is usually about an inch) therefore not exposing all the twisted pairs wires too much for any termination to be done.
- Insert wires fully into the RJ45 keystone jack for optimal performance.: Be sure all of the wires have been pushed into place in the appropriate keystone slotted holes before finally locking them into the keystone.
- Check Color Coding: It is important to confirm that the wires are correctly inserted based on the selected wiring standard to lessen the chances of wrong termination.
- Employ Consistent Tools: Avoid using standard tools that can be any generic tool for the termination, as this can work against precision and make the results unreliable.
- Test Connections: If any of the cables are terminated, each pair of terminations must be tested with a tester before they are used to complete the terminations.
What Customers Are Saying: Reviews of Popular RJ45 Punch-Down Tools
Top-Rated Punch-Down Tools on Amazon.com
When selecting a punch-down tool, it is important to take into account ergonomics, how long the tool will last, and whether it can work with different keystone jacks and wiring standards. Below are the tools recommended by the experts due to their efficiency and quality:
- Klein Tools VDV226-011: This tool is optimally built in terms of comfort and flexibility. It equips an interchangeable cutter blade with Multi-SC connector fittings, which makes it a popular tool among many of the technicians.
- Fluke Networks 10051100: This strong punch-down tool has been called the best in terms of accuracy and ease of use. It has a cutter and wire stripper to make all installations quick and easy.
- TRENDnet TC-PDT is a reliable punch tool for terminating Ethernet cables. This tool impresses for its price point yet delivers great performance. It is pretty light in weight and simply too easy for everyone to operate, regardless of their skills.
- Greenlee 45501: This punch-down tool is rated high build quality and offers an impact and non-impact termination feature. The users have flexibility in installation modifications.
While user reviews can greatly enhance the chances of ensuring that each punch-down tool purchased possesses the needed features or meets a given feature requirement, that will aid in improving how cable installation would be better done.
Customer Reviews: Best Punch Down Tools for Home Networks
While evaluating punch-down tools that are specially designed for home networking purposes, users tend to state the following features: usability, ability to terminate connections, and build quality. To illustrate, it is a common complaint among many users of the Klein Tools VDV226-011 that even though it is effective while in use, the user always has to take a break because of the discomfort created by most software wiring jobs. Similarly, a tremendous amount of appreciation goes to Fluke Networks 10051100 for effectively terming connections, enabling users to produce results that resemble those of professionals without much difficulty. This product appeals to the cost-savvy users who I am sure do not wish to compromise on the performance; it performs well in home surrounding setups, though rated with a 10-pack consistent throughout. All in all, the impressions left by the customers indicate that when it comes to selecting a punch-down tool, it is the user’s networking needs and personal choice that will make the installation successful.
Frequently Bought Together: Essential Tools and Accessories
In addition to punchdown tools, additional related products that customers consider necessary when buying tools for installation purposes are discussed below.
- Cable Strippers: Cable management best practices begin with the right stripping tools. Klein Tools 11054 is, however, popular as it can strip various cables and is a necessity in wire preparation for termination.
- RJ45 Connectors: Mediabridge and JARDIN are some of the quality connectors that must be used in order to achieve proper connectivity. These connectors are standard fit to ethernet cables and enhance efficiency maintenance.
- Cable Management Clips: To achieve a neat and orderly installation, solutions such as VELCRO Brand One-Wrap Cable Ties and plastic cable clips can be used to ensure that excess cable does not wind and lead to a messy overall presentation.
These additional tools, useful to novice users and experienced technicians, supplement the efficient and professional implementation of networks.
Step-by-Step Guide: Terminating an Ethernet Cable with an RJ45 Punch-Down Tool

Necessary Tools and Materials
To successfully terminate an Ethernet cable with RJ45 using a punch-down tool and a punch tool, the following tools and materials are needed:
- Punch-Down Tool: The Fluke Networks 110 is one such punch-down tool, which is necessary to push the cable wires into the ports and patch panels effectively.
- Ethernet Cable: shielding twisted pair cables such as CAT 5e or CAT 6 are generally needed for transmission purposes and should be cut into required lengths as per the installation preferences.
- RJ45 Connectors: At the end of the Ethernet cable, these connectors are affixed for the interconnection between the devices, switches, and routers. It must not be due to a cable type mismatch.
- Cable Strippers: This tool is designed to remove excess outers from Ethernet cables, enabling the preparation of individual wires for termination.
- Wire Cutters Are used to cut wires with excess length after termination in order to install the Ethernet keystone jack, which will be white in color, neatly.
- Cable Tester: This device is used after the cables are installed to check for continuity where the cables are well terminated so that the network works properly.
Step-by-Step Instructions
- Prepare the Cable: Using the cable strippers, strip approximately 1 to 2 inches off the outer beat of the ethernet cable, taking care not to injure the inner wires.
- Arrange Wires: The twisted wire pairs should be untwisted and pulled straight. Floating the wiring standard (T568A or T568B) to melt the wires in the appropriate position.
- Trim Wires: Identify the little dispenser of wire cutters and cut the wires that are not of the desired length evenly so that the length is ready for any insertion into the RJ45.
- Insert Wires into Connector: Place the trimmed wires inside the RJ45 connector appropriately as much as it requires one to push them at the end of the connector, each wire must reach the end and fit in to the respective channel.
- Use the Punch-Down Tool: Insert the RJ45 connector into the punch-down tool and press down hard to secure the wires.
- Inspect Termination: Ensure and confirm that the connector does not have an overhang or protruding conductive material and is factory-finished with wires adequately interlaced.
- Test the Cable: Take the cable tester according to the particular way of testing it, connect the cable to the machine, and test mail. This is essential for ensuring dependability in an established patch panel and wall plate network.
Common Mistakes to Avoid
- Improper Wire Arrangement: Not wiring according to standard conventions (T568A or T568B) can lead to connectivity problems. This means that you should always check it twice before proceeding to termination.
- Insufficient Stripping: Not stripping away enough insulation may not allow the wires to reach the RJ45 fully, whereas on the flip side, if they are stripped overly fast, this will lead to shorts. Consider striking a middle ground in the selection of the various RJ45 Ethernet options.
- Unequal Wire Lengths: Cutting wires of unequal lengths may cause reliability troubles when inserting them. Ensure all the wires are the same size to avoid improper connections.
- Inadequate Insertion Depth: If the wires inserted into the RJ45 connector do not go as far as the two-sided end of the connector they are likely to result in bad connection. Check the plugging of each single wire and the reliability of each wire after plugging.
- Neglecting Visual Inspection: Inspection is often ignored, but misuse of this step may involve undetectable issues, such as cut wires or improperly aligned wires that can cause performance issues. Always run a quick visual inspection after termination.
- Omitting Cable Testing: Appropriate steps are not taken regarding cable testing, and as such, faults remain hidden until several months later, when the network fails due to its inability to function well. Henceforth, have cable testing as part of your procedures.
Reference Sources
Punch down tool
Category 5 cable
Wire
Frequently Asked Questions (FAQs)
Q: What is the RJ45 punch-down tool, and why do I need it?
A: The RJ45 punch-down tool, also called a 110 punch-down tool, is a nifty gadget. It even allows coaxing scant mobile phones to inclined intertwined wire into four guide keystone jacks. The tool is used properly to secure your network system by terminating the Cat 6, Cat5, or other Ethernet cables into keystone jacks and patch panels.
Q: How do I use an RJ45 punch-down tool for keystone jacks?
A: Using the RJ45 punch-down tool on the keystone jacks involves first stripping off the cable’s outer jacket and untwisting the wire pairs. Order the cables according to the color code present on the jack, then quickly and carefully place the cables into the IDC terminals of the jack with a punch-down tool.
Q: What are the key moments to watch when using the punch-down tool?
A: Aspects to remember include the twisting and color coding of the wire pairs and their alignment, Measurements during the punching down to ensure each wire is compressed down but has no tension while punching Down, and verifying that the inner workings of the punch down are connected without breaking any of the cables.
Q: Can the same punch-down tool be used for both cat five and cat six cables?
A: It is possible to employ the same punch-down tools for both cables, as the punch-down tool is constructed for use with different types of cables and in the termination performance on keystone jacks and patch panels.
Q: What is the difference between a punch-down tool kit and a crimping tool?
A: A punch-down tool kit is a collection of tools that helps terminate a cable into jacks and patch panels, whereas a crimping tool is used for connecting cable connectors, such as RJ45 plugs, at the end of cables. Both are very important tools to use in the dissimilar network cable installation phase.
Q: How can I ensure the ethernet keystone jacks meet UL requirements?
A: To avoid troubles with your ethernet keystone jacks in the future, always check the product description for any suggestions that the keystone is UL-certified. This indicates that this product complies with safety and other performance standards.
Q: If I have a punch-down tool, what else in addition would I need?
A: In addition to the punch-down tool, the toolkit may include a wire stripper, crimping tool, punch-down stand, and probably all sorts of accessories to speed up the installation exercise.
Q: Are keystone jacks by themselves physically equipped for use without necessarily buying or fitting a wall plate?
A: It is advisable to use a wall plate with keystone jacks to achieve a tidy and professional look. Wall plates act as barriers to protect the jacks and enhance an organized appearance of installation because the jacks may be embedded in the walls and box surface mounted.
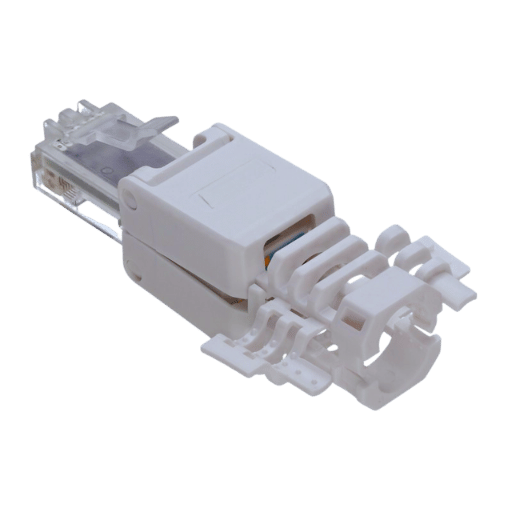
Q: What are the sideline advantages of using an angled cat6 keystone jack?
A: An angled cat6 keystone jack assists in organizing the routing of cables in tight areas, prevents cable stress, and simplifies the connection of devices in confined spaces behind patch panels or wall plates.
Q: Where can I find punch-down tool kits that I can rely on?
A: To find punch-down tool kits that you can rely on, look for well-respected brand names such as Cable Matters and VCElink, read product reviews, and make sure the tools you require are fit for any terminating purpose, like patching in Cat 6 or Cat5 cables.
Post Views: 8,140