An effective network is fundamental to any system reliant on technology, both in terms of functionality and reliability. For home offices, small businesses, and even larger enterprises, understanding the role of a patch panel can fundamentally change a user’s approach toward network management. But what is a patch panel, and what makes it so critical to an optimized network that is both scalable and agile? In this article, we explore the purpose, advantages, and possible uses of patch panels so that you can configure your network infrastructure effectively. Mastering this component will improve cable control, streamline troubleshooting processes, and create a dependable network. This guide covers everything required to maximize the potential of your network.
How Does a Patch Panel Work?
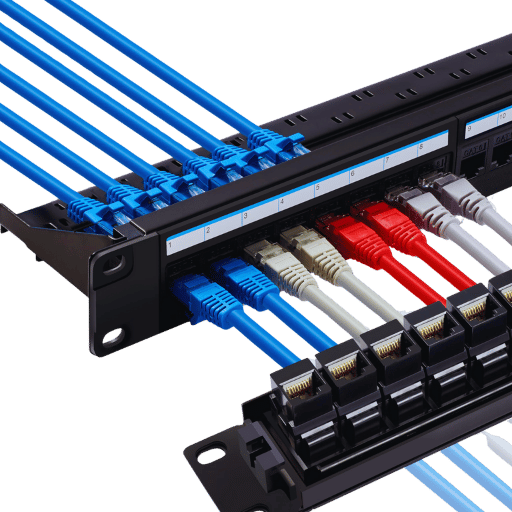
A patch panel centralizes organizing and interconnecting network cables. Communication between devices is achieved through the interconnection of incoming and outgoing wires at specific ports. Cables from multiple sources, like servers or switches, are terminated at one side of the patch panel. The other side houses patch cords that connect to other devices or network equipment. This configuration enhances cable organization, facilitates configuration modification, improves troubleshooting through isolated connections, and optimizes overall efficiency.
What Role Does a Patch Panel Serve in Networking?
A patch panel provides a single point for interfacing and managing network connections. It enables effective cable planning and repurposing, simplifying, changing, or solving problems within a network without affecting the entire system. By consolidating cable termination into one area, the patch panel improves organization, decreases disorder, and aids in sustaining peak network performance. Its primary function is to facilitate network accessibility while offering an expandable structure for controlling the growth of complex systems.
How Do Patch Panels Work with Network Cables?
Patch panels serve as single points of access through which an organization’s numerous network cables can be interconnected and structured. Each network cable is systematically terminated at the rear of the patch panel, while the face of the patch panel has ports that facilitate easy connection to devices or switches. This configuration enables easy communication as it simplifies the process of connecting, disconnecting, or reconfiguring the cables by network administrators without any impact on other portions of the system. Throughout the process, adequate system wiring is achieved, streamlined issue resolution is enabled, and adaptability to changes in network requirements is provided.
Understanding Wiring in Patch Panels
Patch panel wiring includes connecting cables to specific ports to enable communication within the network. Each cable is terminated at the back of the patch panel using the punch-down blocks method or other termination methods, and its corresponding ports at the front are connected to devices or switches. Following the labeling procedures and adhering to cabling standards T568A or T568B provides greater assurance of enhanced reliability. This systematic method simplifies the network’s configuration and maintenance by delivering easier updates and troubleshooting when needed.
What is the Difference Between a Patch Panel and a Switch?
When to Use a Patch Panel Over a Switch?
A patch panel is recommended over a switch when there is a need to organize and manage network cables within a structured cabling system. A patch panel operates as a center of hub for cable interconnections, making it possible to quickly identify and label various network subdivisions and rearrange the network pathways. Unlike a switch, patch panels do not manage network traffic; they only indirectly connect multiple devices to a switch or router, serving as a physical infrastructure tool. They are most beneficial to an organization where scalability, cable management, and network maintenance are required.
Benefits of Patch Panels in Cable Management
Using Patch panels to organize a network structure offers many advantages. One is improved cable management because patch panels collect connections in one area, allowing easier access to all cables. This, in turn, reduces the overall clutter in the troubleshooting processes. Moreover, when properly used, patch panels provide a professional touch that assists in avoiding tangling and unintentional disconnecting of cables.
Another notable benefit of Patch panels is their scalability. With Patch panels, the network can expand with new devices with minimal rewiring. For instance, large-scale data centers can use modular patch panels, which enable new devices or connections to be added without disrupting the already established systems.
Patch panels make maintenance work more efficient. They provide easy access to marked ports and cables, enabling quick identification of issues, which is vital in time-sensitive environments. Research on patch infrastructure suggests that structured cabling systems that use patch panels can reduce operational delays and downtime by almost 50% by streamlining processes.
Using patch panels offers several advantages, like a signal loss caused by an equipment malfunction. When high-quality patch panels are used, they reduce electromagnetic interference (EMI), ensuring smooth communication between devices. This is crucial for industries and businesses that depend on data transfer at high speeds.
Lastly, by using patch panels, the life longevity of cables can be extended. Patch panels act as a middleman and protect equipment ports and cables from damage over time as they interface with ports on machines that need to be disconnected and plugged back in repeatedly. This method saves operational spending in the long run and fortifies network infrastructure.
What Are the Advantages and Disadvantages of Patch Panels?
Key Benefits: Centralizing Your Network
One primary advantage of adopting patch panels is network management centralization. Patch panels facilitate troubleshooting and maintenance by consolidating cables into an organized framework, simplifying resetting and retesting processes. Studies also demonstrate that centralized cabling systems allow for quick problem identification, minimizing downtime during maintenance.
Patch panels also enable businesses to seamlessly add, remove, or reconfigure devices beyond the limits of the core infrastructure. This ease of access amplifies strategic growth. Additionally, industry benchmarks show that these networks have a 30% reduction in upgrade costs due to reduced labor and material expenditures, further establishing the superiority of patch panels over traditional setups.
Moreover, superior centralization leads to better cable arrangement, which mitigates airflow obstruction and clutter accumulation, two frequent data center challenges. Proper organization also reduces interference risks and damage that adversely impact network performance and reliability. These centralized structures allow IT departments to monitor systems actively and in real-time, improving responsiveness and operational efficiency.
Potential Disadvantages of Patch Panels
While patch panels have benefits, organizations need to address concerns. One notable issue is the cost of installation. Depending on the size and complexity of the network, patch panel systems tend to be expensive in terms of hardware, cabling, and labor. These costs can present a serious problem for smaller enterprises or startups operating on limited budgets.
Patch panels must also be monitored regularly to maintain sound performance and order. Ports can be severely mismanaged without oversight, leading to connectivity issues and increased downtime. An IT management report notes that troubleshooting outages with unmaintained patch panels can add as much as 20% to the required time to resolve the issue.
Finally, other factors include space limitations in server racks and data centers. While cable management is a key strength, patch panels with multiple interconnections require considerable storage space, which can limit other crucial equipment. This is especially true in high-density configuration environments.
Lastly, errors such as wrong labeling or bad connections could arise from the dependence on human supervision, whether during installation or maintenance. These errors can make troubleshooting networks more challenging and may, if not quickly remedied, cause prolonged service interruptions. When adding patch panels to their systems, businesses must consider these drawbacks and advantages.
How to Use a Patch Panel with Cat6 Cables?
Setting Up a Cat6 Patch Panel
In setting up a Cat6 patch panel, you would need to follow these processes:
- Mount the Patch Panel: Attach the patch panel to a rack or wall-mount bracket, ensuring it is secure and easy to access.
- Prepare the Cat6 Cables: Strip the external jacket of each Cat6 cable to expose the wires inside, but not too much so that termination becomes complicated, but enough slack is provided. By performance standards, ensure the cable jack remains reticulate until termination.
- Organize the Wires: Order the internal wires T568A or T568B wiring standards. Uniformity across all connections needs to be ensured.
- Terminate the Cables: Place each wire into the appropriate openings for the patch panel. Securely fasten the cables with a punch-down tool while not damaging the conductors.
- Connectivity testing: Using a cable tester would appropriately show that all connections are functioning as expected.
- Label the Ports: Ports on the patch panel should be cross-referenced easily for network management and clearly labeled.
- Connect Devices: The devices or switches that need to be used with the devices mentioned above should be connected using short patch cables at the corresponding ports on the patch panel.
This ensures the patch panel is fully installed and operational while maintaining a cohesive environment.
Step-by-Step Guide to Connecting Ethernet Cables
- Select the Right Cable: Based on your network’s speed and performance, choose an appropriate type of Ethernet cable, such as Cat5e, Cat6, or Cat6a.
- Check the Cable and Connectors: Ensure the cable and connectors are free from visible damage that may affect performance.
- Connect to the Device: Connect one end of the Ethernet cable to the network port on the specific device (e.g., computer, router, switch).
- Connect to the Network Source: Connect the other end of the cable to the right port of the router, modem, or switch.
- Secure the Connection: Make sure both ends of the connectors are clicked into place securely.
- Test the Connection: Review the device’s network settings or use a diagnostic tool to check if it can connect.
These steps provide a stable and efficient Ethernet connection while ensuring optimized network performance.
Troubleshooting Common Cat6 Patch Issues
While troubleshooting typical issues in a Cat6 patch, adopting the following measures simplifies the problem-resolving process:
- Check Physical Connections: Ensure all connectors are correctly connected to the appropriate sockets. Connections that are not adequately made may cause a loss of signal.
- Inspect the Cable: Check the cable for signs of damage or bends. If it shows cuts, broken wires, or other damage, it must be replaced.
- Verify Compatibility: Ensure that all devices, such as switches and routers, are compatible with the specifications of the Cat6 cable. Using incorrect hardware can affect the devices’ performance.
- Test with a Cable Tester: With a tester for Cat6 cables, test for wiring issues like split pairs, etc. Fix the faulty wires or remove them altogether.
- Check Network Configuration: The device’s network settings (IP address, DNS, subnet mask, etc.) should be accurate. Improper parameters may prevent the desired connections from being achieved.
- Eliminate Interference: Move the cable away from Electromagnetic Interference (Power lines, fluorescent lights, etc) to enhance the performance that may be weakened.
- Update Firmware or Drivers: Ensure that Network adapters and switches bearing the Cat6 connection port have updated firmware or network drivers; otherwise, device interoperability shall not be sustained.
By following these steps methodically for each issue, you can patch the Cat6 cable and make the devices more responsive.
Do Patch Panels Have Different Wiring Standards?
Understanding Cat5 and Cat6 Patch Panels
Regardless of type, all patch panels adhere to specific wiring standards, either T568A or T568B, used in Cat5 and Cat6 systems. The performance differences between the types of patch panels are the most noticeable. Cat5 patch panels are created for networked systems with bandwidths up to 1 Gbps, while Cat6 patch panels have higher speeds of up to 10 Gbps. Cat6 patch panels perform better over longer distances because of lower crosstalk and better signal quality. Both types of patch panels must be used with the corresponding cables and hardware to guarantee full functionality.
Exploring Connector Types in Patch Panels
Patch panels contain connectors that interface with Ethernet cables. The connector most often found on patch panels is the RJ45, which is used for a regular Ethernet connection. Standard Ethernet connections utilize RJ45 connectors that work with Cat5 and Cat6 cables so that data can be sent without issues. Some patch panels may also have punch-down blocks that enable secure termination of individual wires from the cable they want. These connector types help guarantee good network performance when correctly fitted and serviced.
Best Practices for Wiring a Patch Panel
- Plan the Layout: Before the installation process, it is necessary to outline the network diagram and trace all the cables. This enables proper identification and organization during the installation process, reducing the chances of mistakes and making it easier to maintain the system down the road.
- Use Quality Tools: A punch-down tool and cable tester are used to cut and connect the wires, and the connections are tested afterward because these tools guarantee reliability.
- Follow Cable Standards: Always adhere to T568A or T568B wiring standards to ensure uniformity and appropriate network connectivity.
- Avoid Overcrowding: Do not bend or bundle cables, as this could damage the wires or interfere with transmitting signals.
- Label Connections: For assigned ports in the patch panel, clearly indicate the device or location associated with the port so that future troubleshooting can be done quickly.
- Perform Testing: After wiring, test each connection with a network cable tester to ensure there are no disruptions or weak points in the system.
Applying these procedures enables the formation of a well-structured and reliable patch panel that efficiently supports and enhances the network’s performance.
Frequently Asked Questions (FAQs)
Q: Explain in your own words what a patch panel is and its significance to a network configuration.
A: A patch panel is an instrument with multiple ports that arranges and connects network patch cables to routers or switches. It manages network connectivity appropriately and orderly, improving the efficiency of routing and connecting wires to different network devices.
Q: What are the primary types of patch panels?
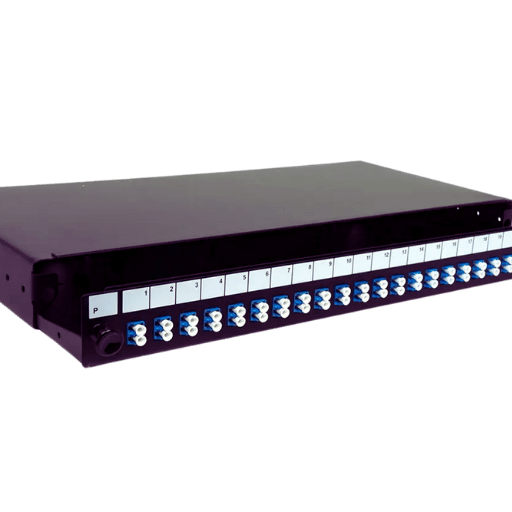
A: There are 24-port and 48-port patch panels, Cat5e and Cat6 patch cables, fiber optic patch panels, and 19-inch patch panels. Each type of patch panel is designed to meet specific requirements based on the size and needs of the LAN configuration.
Q: What is the process through which a patch panel offers connectivity to a Local Area Network (LAN)?
A: A patch panel offers connectivity by running cables from different endpoints, such as computers or other network devices, to a network switch. A patch cord interconnects the wires. This arrangement enhances the management of organized network cabling and makes connection path changes easy if needed.
Q: What is the difference between using a patch panel and connecting directly to the switch?
A: Connecting directly to the switch can result in messy cabling, complicating network maintenance and troubleshooting. Patch panels organize cables and serve as a central point for connection, simplifying maintenance and future modifications.
Q: In what situations or ways can one choose between CAT5e and CAT6 patch panels?
A: The bandwidth capabilities of the network and the cables employed determine the choice between CAT5e and CAT6 patch panels. CAT5e is sufficient for basic network configurations, while CAT6 is more favorable for high-speed data transmission.
Q: Can patch panels be used for copper and fiber optic networks?
A: Patch panels can be utilized for copper and fiber optic networks as they offer flexible access points. Each type of cabling comes with specialized panels that enable effective organization and management of copper and fiber optic connections within the network.
Q: What are the uses of a patch cord in conjunction with a patch panel?
A: A patch cord connects a short cable from network devices to the patch panel. It may also connect the patch panel to other networking equipment, such as switches or routers. The patch cord helps connect various elements and map out the network topology, allowing the efficient movement of data and the arrangement of the cables.
Q: Describe how a 24-port patch panel works compared to a 48-port panel.
A: A 24-port patch panel is used in smaller networks with fewer devices and, hence, has less demand, while a 48-port panel is used in more extensive networks to provide more connections. You choose one based on your LAN architecture’s scale and needs.
Q: What are the disadvantages of patch bays over direct connections?
A: Patch bays can reduce the time spent routing many cables under a desk, enhancing organizations. Their neater configuration also simplifies maintenance and upgrades, making them easier to work with in case changes arise.
Q: Are there alternatives for patch panels to organize networks?
A: Patch panels are popular but can be replaced with structured cabling systems or direct cable termination to switch ports. These methods, however, may offer less flexibility and organization than patch panels.
Reference Sources
1. “Patch panels in the sky: a case for free-space optics in data centers” (Azimi et al., 2013)
- Key Findings:
- Explores the possibility of a fully wireless inter-rack datacenter architecture featuring hyper-flexible network topologies that can change to meet future traffic requirements and eliminate worries about cabling complexity.
- It argues that free-space optical (FSO) technologies will enable new capabilities that are otherwise impossible due to lower interference footprints, the ability to support longer ranges, and higher bandwidths than traditional wireless/RF technologies.
- Methodology:
- The paper illustrates some practical problems that must be overcome to use FSO technology in data centers and the advantages over existing data center architectures.
2. Electrical connector
3. Patch panel
Post Views: 1,590