Fiber patch panels are essential for present-day data centers and telecommunication networks, which organize fiber optic cables for easy use. Here, you can expect to find a complete guide on these panels that includes their different types, what they do, and why we need them, among other things. Moreover, there will also be tips for installing and maintaining these units so that they work best and last long in any network system. If you are an IT expert who wants better performance from your current setup or is just starting with computers, this should give everything necessary about fiber patch panels.
What is a Fiber Patch Panel?
Defining a Fiber Patch Panel
A fiber patch panel, or a fiber distribution panel, is used to conclude the fiber optic cables and offer entry to individual fibers for cross-connection. It cannot be overemphasized that these devices should have effective fiber management. This is usually done using a metal or plastic box that contains many adapter panels or cassettes for interconnecting and routing optical fibers. The fiber patch panel primarily makes it easy to manage different connections involving termination points and to identify and troubleshoot problems on optic circuits within networks.
Common Types of Fiber Patch Panels
Fiber patch panels are available in several types that suit different functional requirements and installation environments. The most common ones include;
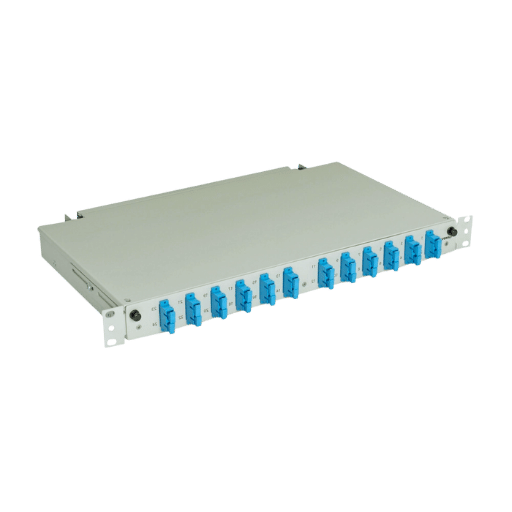
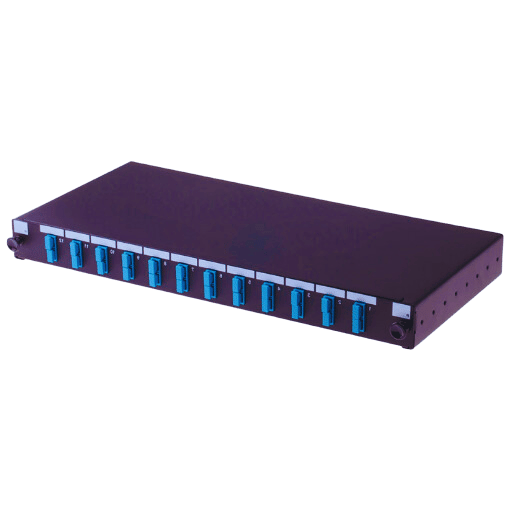
- Rack-Mount Fiber Patch Panels: These panels are designed to fit into a standard 19-inch rack, commonly found in data centers and telecom rooms. They boast high port density and are easy to install and maintain.
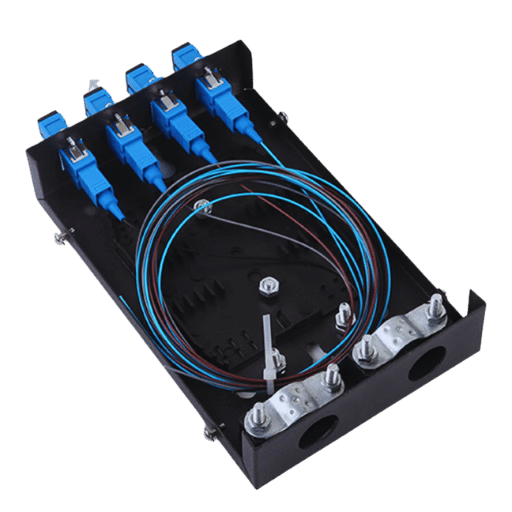
- Wall-Mount Fiber Patch Panels: In spaces with limited rack capacity, the wall-mount fiber patch panel can be directly mounted on walls, saving space. They’re mostly used for small network deployments or remote locations.
- DIN-Rail Mount Fiber Patch Panels: DIN rails are standard in industrial settings where space might be tight, hence their popularity among such establishments. Additionally, outdoor fiber patch panels may serve well in such an environment.
- Enclosure Fiber Patch Panels: Since enclosure fiber patch panels are versatile units, they offer numerous mounting options, including ceilings, utility poles, or walls. They are typically used in outdoor or harsh environments where they are more likely to be exposed to adverse conditions, thus requiring rugged components like those provided by RLH Industries.
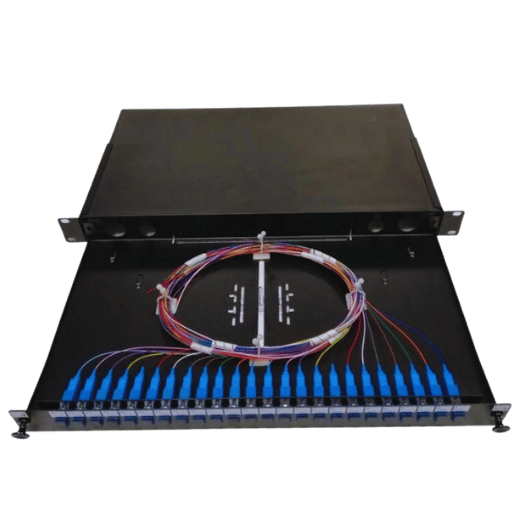
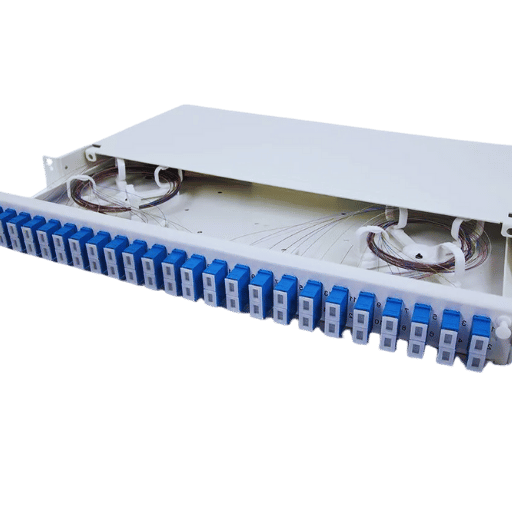
- Slide-Out Fiber Patch Panels: These devices’ sliding feature allows easy accessibility to individual fiber cassettes or adapter panels, which speeds up and simplifies maintenance activities and upgrades.
Choosing the correct type of fiber patch panel enables network administrators to improve their optic infrastructure’s organization, efficiency, and scalability.
Benefits of Using Fiber Patch Panels
There are several things that could be done to make a network management system efficient with the use of fiber patch panels. Firstly, organization is enhanced as connections are brought together at one point, simplifying controlling them and finding out what is wrong or where the problem lies. Secondly, they quicken network maintenance procedures while upgrading since individual fibers can be accessed without interrupting the setup. Thirdly, its scalability feature enables network managers to add or change connections without much effort easily. Additionally, signal integrity is improved through these devices because they protect against too much bending and handling that leads to loss and degradation of signals. This makes for more reliable, manageable, and scalable fiber optic infrastructure systems overall.
How to Install a Fiber Patch Panel?
Preparation and Tools Needed
Make sure you have the following tools and materials ready before you install a fiber patch panel:
- Fiber Optic Cable: Select the appropriate type and length for your network needs.
- Fiber Patch Panel: Choose the right patch panel for your application.
- Fiber Optic Connectors: SC, LC, or other types, depending on your system.
- Fiber Stripper: Used to strip off the outer jacket of the fiber optic cable.
- Fiber Cutter: This tool is necessary for accurately cleaving fiber ends. It is especially important when dealing with LC-to-LC fiber connections.
- Crimping Tool: Used to secure connectors onto the fiber cable.
- Cleaning Kit: This kit cleans fiber connectors and ensures optimal signal transmission. RLH Industries recommends using high-quality cleaning kits in this regard.
- Splice Tray (if needed): Provides a means of managing fiber splicing.
- Screwdriver and Mounting Hardware: Required to secure the patch panel at its designated location.
Preparing well and having appropriate tools will make installation easier and improve the performance and durability of your fiber optic network.
Step-by-Step Installation Guide
- Mount the Fiber Patch Panel: Use the screwdriver and mounting hardware to attach the patch panel securely to a designated rack or wall location. Be sure it is tight in place so it does not move.
- Prepare the Fiber Optic Cables: Using a fiber stripper, strip off the outer jacket from the fiber optic cables, being careful not to damage internal fibers. Then, cleave the ends with a fiber cleaver, making them even and smooth.
- Install Fiber Optic Connectors: Fix suitable connectors (SC, LC, etc.) onto both sides of prepared fiber cable ends and compress each connector appropriately using a crimper tool so that all connections are aligned correctly without any loss, which can cause signal loss.
- Clean the Fiber Optic Connectors: Before plugging them in, clean the fiber connectors properly with a cleaning kit. Cleaning ensures that light signals pass through the fiber well. Any dirt or dust may lead to poor signal quality, so this step is critical for best performance.
- Insert Cables into Patch Panel: Put one end of a cleaned and prepared optical fiber connector into the respective slot provided by the patch panel while ensuring that every connection is seated firmly enough for maintenance during service life. Also, good continuity between equipment connected through it should be maintained.
- Organize and Label Cables: Secure cables neatly within patch panel space using cable ties or clips. Label each connection according to your network schema to facilitate easy maintenance when troubleshooting becomes necessary later.
- Test the Connections: After completing the physical installation, test all connections made by this point to ensure proper signal transmission. A fiber optic tester, among other relevant tools, can be used to check the continuity strength and quality of signals passing along different points within the installed link system.
These steps will help you install a fiber patch panel, improving your optic network’s reliability and manageability.
Common Mistakes to Avoid
- Incorrect Cleaning: Ignoring the need to clean fiber optic connectors properly can cause significant signal degradation. Even the smallest particles of dust or dirt can block the path of light; thus, it is essential to ensure that the connectors are spotlessly clean before installation using appropriate cleaning tools and techniques.
- Improper Cable Management: If cables are not well organized, they can easily get tangled up, strained, or become defective in the long run. Use cable ties or clips when arranging wires within a patch panel to ensure they are neat; also, ensure there is enough slackness in them so as not to stretch them tightly.
- Use of Incompatible Connectors: Connectors that do not match your fiber optic cables may result in connection problems and signal loss. Always confirm if your connectors (for example, SC and LC) are compatible with the cables and equipment utilized in your network.
What Are the Different Types of Fiber Patch Panels?
Wall Mount Fiber Patch Panels
Wall mount fiber patch panels can be fixed to walls directly to facilitate compact and practical distribution and the management of optic fibers. They are usually employed in smaller networks or environments with limited space; thus, they come in diverse styles and types for different purposes. Also, it is possible to fit simplex and duplex adapters together in these wall mounts, which may have pre-configured or customizable setups. Among the features that can be provided with these units are lockable doors (for security), several cable entry points (for flexibility), and integrated cable management systems (to ensure proper organization as well as relieve cable stress). By adopting them, administrators will realize clean access points while saving time during fiber installation, improving overall network efficiency and reliability.
Rack Mount Fiber Patch Panels
Ideal for larger network setups with a lot of fiber optic cable that needs to be managed, rack mount fiber patch panels are supposed to be put into 19-inch server racks. These units act as the central point where fibers can be terminated and spliced, thus making sure everything is organized and safe. Rack mount fiber patch panels come in different sizes, such as 1U, 2U, or 4U, all of which have the capacity for many fiber connections, further enhancing network scalability. Some have removable cover plates or slide-out trays allowing easy access during maintenance or reconfiguration. In contrast, others come equipped with robust cable management systems featuring bend radius protection, among other efficient routing mechanisms, to ensure maximum performance plus life span on any fiber optic network. They also support different adapters like LC, SC, MTP, etc., which gives them flexibility when connecting various components within a fiber optic system. Using these devices, data centers can be made more organized and cleaner, thus leading to faster speeds and better reliability across networks, according to network administrators who utilize them frequently.
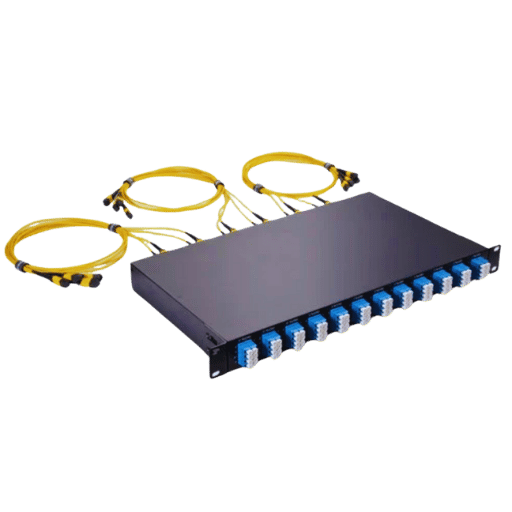
High-Density Fiber Patch Panels
Compact fiber patch panels are designed to ensure that space is used as much as possible by fitting more fiber connections into small spaces, which has become a very important aspect of modern data centers and telecommunication facilities. These patch panels allow for higher density by condensing many fibers into a smaller footprint, thus enabling interconnection without expanding physical space. Cable management aspects in high-density panels are usually advanced; for example, modular cassettes, which can be configured easily or upgraded conveniently, are among them. This makes it easier to maintain and ensures scalability during network growth periods while saving time due to simplicity during installation. Additionally, various other features are incorporated in these panels, such as ultra-low loss connectors and high-performance adapters, which greatly help reduce signal attenuation, thus contributing towards better network performance overall. Integrating this technology allows one to effectively deal with many fiber connections at once while improving data transfer rates and keeping the network design neat and efficient.
What Accessories Are Needed for a Fiber Patch Panel?
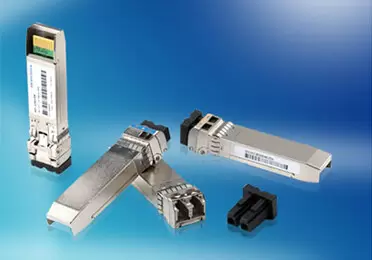
Fiber Adapters and Connectors
Fibre optic adapters and connectors are crucial for setting up and using a fiber patch panel. Fibre adapters, also called couplers, enable fast connections between two cables by accurately aligning the cores of their fibers to guarantee minimal signal loss and excellent network performance. LC, SC, ST, and MTP/MPO are standard fiber optic adapters, each made for different connector styles.
On the other hand, fiber connectors are used to terminate optical ends that should be connected with different devices used in networking. LC, SC, FC, ST, and MTP/MPO are the most popular types of these connectors, which vary in size compatibility and performance characteristics. Typically, these connectors are employed with fiber adapters to deliver secure connections within patch panels; thus, they should not be overlooked. High-quality connectors are necessary to reduce insertion and return loss so that signal integrity throughout the system is maintained at its best. Hence, fiber adaptors or couplings and their corresponding connecting parts play significant roles in practical operation and scalability within fiber-optic networks.
Cables and Patch Cords
For a fiber patch panel system to work, cables and patch cords must link the different components. Different fiber optic cables are available, such as single-mode and multi-mode cables, each engineered for specific network environments and performance demands. Single-mode fibers are used in long-distance communication because they can transmit low-loss signals over longer distances. In contrast, multi-mode fibers are designed for short-reach applications with higher data rates.
Patch cords, also called patch/jumper cables, help establish direct connections between devices or from patch panels to equipment in data centers and telecommunications rooms. These short cords usually have pre-terminated connectors on both ends, ensuring a quick and reliable connection. Such setups often use LC to LC fiber connectors. The types of patch cords include LC-LC, SC-SC, and MPO-MPO, which match up with connectors/adapters used within the network.
When choosing cables and patch cords, it is essential to consider factors like compatibility with existing infrastructure, required bandwidth, and durability needed for reliable network performance improvement. High-quality cables and good patches reduce signal losses, enabling effective data transmission and enhancing overall network reliability and efficiency.
Splice Trays and Fiber Enclosures
Splice trays and fiber enclosures are essential for fiber optic splicing organization and protection in a network. They manage splicing fiber cables to protect such connections from physical damage and harsh climatic conditions. These trays have divisions where splices are stored, and protective sleeves are used to safeguard fusion splices.
Conversely, patch panels or other components for controlling fibers may be housed within one place provided by a fiber enclosure. Depending on various network environments ‘ requirements, these enclosures come in different forms: wall-mounted, outdoor, and mounted types. They keep organized, accessible, and protected fiber optic connections, which significantly helps ensure network up-time performance remains stable throughout.
When choosing between splice trays and an enclosure, it is essential to consider the number of splices being made and whether they will be fusion or mechanical. The ease of access required for maintenance and environmental protection is also needed. Sound quality management systems significantly contribute to the longevity and reliability of optical fiber networks, thereby promoting uninterrupted data transfer while maintaining network integrity at all times.
How to Maintain and Troubleshoot Fiber Patch Panels?
Regular Maintenance Tips
Regular maintenance is essential to keep fiber patch panels reliable and performant. Here’s what you need to know:
- Look at it: Examine the patch panel occasionally for visible wear and tear, damaged parts, or loose connections. Clean the outer surfaces of all dust, dirt, or debris that could interfere with connectivity.
- Clean connectors: Special tools and solutions should be used to clean fiber optic connectors. Dirty connectors cause signal loss or degradation. To maintain efficient fiber performance, connector end faces must be cleaned using lint-free wipes and optical cleaning fluid.
- Cable management: Ensure cables are neatly arranged and secured. Utilize cable ties or Velcro straps to manage cable slack so as not to stress the connectors unnecessarily. Also, labelling your cables properly would greatly aid in easy identification during troubleshooting.
- Tension relief: Provide adequate slacks to ensure that cables are not strained when they pass through patch panel ports. This will avoid strain on the connectors themselves.
- Environment considerations: Always make sure patch panels are installed in an area where there is no excess dust, humidity levels are controlled, and temperature fluctuations are kept at a minimum since all these factors can greatly affect the performance of a fiber optic link.
- Keep records: Maintain comprehensive documentation, which includes records of all maintenance activities undertaken, such as inspections done plus any faults detected along with corrective actions taken after that, as this helps in tracking down the historical performance of a given patch panel besides being useful during future troubleshooting exercises carried out by network technicians; some records may be recorded in fiber savvy users’ logs for such purposes too.
If network administrators follow these tips for regular maintenance, they will be able to reduce downtime while ensuring their fiber networks last long and work efficiently.
Common Troubleshooting Techniques
To fix fiber optic network problems, do the following:
- Check Physical Connections: Start by visually inspecting all connections to guarantee that they are plugged in tightly and that none of the cables appears damaged. Poor connection can lead to loss of signal.
- Utilize Visual Fault Locator (VFL): This tool is used when there is a need to identify faults like breaks, bends, or any other physical problem within a fiber cable. It sends out a red light that can be seen and helps you know exactly where the fault is located.
- Inspect for Clean Connectors: Dirty end faces may be cleaned using recommended fiber cleaning tools such as alcohol swabs or wipes, solving many related issues. It should be noted that even dust particles can cause huge signal degradation.
- Optical Time Domain Reflectometer (OTDR) Testing: By analyzing the time and intensity of reflected light, an OTDR diagnoses faults and locates them on fiber optic networks. It can also tell you how long a cable is or if there are any splice points along its length, in addition to showing imperfections.
- Measure Optical Power Levels: Signal losses can be identified by measuring power levels at different locations within the network using an optical power meter. Compare these measurements with expected values to pinpoint where the trouble lies.
- Confirm Network Equipment Settings: Ensure that all devices in your network are properly configured and that there is no misconfiguration leading to this problem with fibers; this involves interface settings checks, firmware version verifications, and other checks carried out under different protocols connectivity level checks as well.
By following these steps, systems administrators will quickly determine what’s wrong with their fiber optics setup and fix it quickly without significantly affecting operations.
When to Contact Sales for Replacement
When you should contact sales for a replacement is a matter of several factors. It is important to contact the sales team if diagnostic tools consistently show intense signal loss or physical damage, such as visible cracks, which cannot be fixed. Once network performance has stayed below par even after trying all troubleshooting techniques and confirming all equipment configurations, it might be necessary to consider getting another one. End-of-life (EOL) notices from manufacturers or no availability of compatible parts are also signs that call for replacements; during this time, consulting with salespeople will help ensure the robustness and efficiency of the network infrastructure to minimize any potential downtimes and operational disruptions.
How to Customize a Fiber Patch Panel?
Custom Enclosure Requests
To meet specific network requirements, several steps must be followed when customizing a fiber patch panel enclosure. Firstly, it is vital to know the dimensions and design of the enclosure needed, whether rack-mount or wall-mount configuration. Such designs usually involve LGX modules. Secondly, the required number and types of ports should be considered, along with cable management features that promote good arrangement and accessibility. Also, the choice of material should be based on environmental conditions and strength, which may require stainless steel or aluminum for rugged protection against damage from external factors. Moreover, customization might include the integration of connectors, adapters, or splice trays depending on the fiber type used within the network being served.
Working closely with manufacturers through joint efforts, detailed design drawings are prepared alongside prototypes so as not to leave any stone unturned in meeting all specifications involved during this process. This enables finer modifications at the pre-production stage; these bespoke enclosures will fit seamlessly into the operational needs of different networks.
Pre-Loaded and Modular Options
To guarantee compatibility with the network setup, it is essential to differentiate between pre-loaded fiber patch panels and modular options. A pre-loaded fiber panel comes readily assembled with adapters, making it easy to install since it saves time. It is most suitable for typical deployments where the network’s needs are well-known.
On the one hand, a modular patch panel offers more flexibility because it allows the administrator to customize by adding or removing modules to suit their requirements at any given time. This feature is advantageous for expanding networks as it supports scalability and simplifies maintenance. Moreover, within the same box, different modules can be mixed, thus providing a wider choice; this makes them perfect for environments that keep changing or those that expect future growth.
In either case, compatibility with existing infrastructure should be considered alongside cable management systems and ease of accessibility if we want our network operations to remain smooth.
Special Configurations and Designs
Specialized fiber patch panel configurations and designs meet unusual operational stipulations and environmental restraints. These tailored solutions can involve high-density panels that utilize space well, angled panels that direct cables better, or rough-service panels that withstand severe outdoor conditions. High-density panels have been designed to provide many ports within a small area, making the limited space available in data centers more efficient. By allowing cables to flow naturally to one side, angled panels reduce tension on connections and increase airflow, which is good for cable management.
Ruggedized panels made from tough materials offer increased protection against moisture, dust, and temperature variations in hostile weather settings. Such outdoor fiber patch panels have been created specifically for this purpose. Furthermore, some come with integrated monitoring and management systems to enable real-time data analytics and network performance tracking. By selecting configuration options for specific situations, an organization can meet its unique network infrastructure requirements while ensuring dependable serviceability.
Reference Sources
Optical fiber
Patch cable
Patch panel
Frequently Asked Questions (FAQs)
Q: What does the term fiber optic patch panel mean?
A: It is a device that allows for connecting fiber optic cables by providing termination points where fibers can be connected and managed within a network. This is also used to connect different optical fibers with other networking equipment, thus giving an easy way of organizing and handling such connections.
Q: Why should I use a 1u fiber patch panel?
A: The 1u fiber patch panel is smaller in size hence saving space on racks within data centers or closets. They are usually provided with preloaded patches for convenience during installation. It fits into a standard 1u 19-inch rack, so it works well in high-density environments where there’s a need for maximum utilization of space coupled with simplified cable management.
Q: How do 12 fiber pigtail assemblies function?
A: These consist of twelve bare fibers with connectors already terminated at one end while the other side remains unconnected. They are applied to link optical devices like patch panels or similar equipment, thereby reducing the complexities associated with terminations and ensuring the reliability of connections.
Q: Can I use adapter plates with my fiber optic patch panel?
A: Yes, adapter plates are frequently employed with this device to enable integration between different types of connectors, such as LC, SC, or ST. They make reconfiguration easy and also ensure that the patch panel can accommodate various kinds of fiber optic connectors.
Q: What is the difference between singlemode and multimode fibers?
A: Singlemode fibers possess smaller cores meant for long distance transmissions which have higher bandwidths whereas multimode fibers feature larger cores designed for short distance applications having lower bandwidths. In most cases, telecoms and long-haul data communications employ single-mode fibers, while local area networks (LANs) commonly use multimode varieties.
Q: What are the usual types of connectors used in fiber termination?
A: LC, SC, and ST connectors are among the most common connector types used in fiber termination. Each type has its own specific use cases and benefits. For example, LC connectors are known for being small, which is good for high-density applications, while SC connectors’ popularity stems from their push-pull design.
Q: What is meant by high density in the context of fiber optic patch panels?
A: High density refers to packing a lot of terminations into a small space within fiber optic patch panels. These days, it’s common practice to use high-density patch panels in data centers and telecom rooms, where every inch counts toward maximizing space efficiency.
Q: What must I look at when selecting a 1u fiber patch panel?
A: Some things you should consider when choosing include what kind (singlemode or multimode), how many ports you require, what type (LC, SC, etc.), and whether additional features like internal fibre management or adapter plates are required. Also, ensure compatibility with your existing fiber network infrastructure.
Q: What does a 48 fibers patch panel with LC connectors do?
A: A 48 fiber patch panel with LC connectors will manage/terminate up to 48 individual LC fiber optic connections. The LC Connector is a small form factor, making them perfect for situations with limited space available due to their size. Because of their size, they work great in areas that demand higher-density connections per square foot.
Q: How can I mount a 1u fiber patch panel in a rackmount setup?
A: To mount a 1U Fiber Patch Panel in Rackmount Setup, Align Panel Mounting Brackets with Rack Mounting Holes on the 1U 19” Rack Unit. Ensure that it is appropriately aligned. Secure it using compatible screws level and secure this will give you a stable platform so that you can manage your fiber optic connections from one central point.
Post Views: 6,276